the key takeaways from our data platform journey are:
- Focus on a low-maintenance data platform with high ROI.
- Prioritise developer-friendly design, intuitive configurations, and ease of change implementation.
- Embrace declarative and stateless architecture for simplicity and maintenance.
- Implement GitOps principles for version control, collaboration, and automation.
The Challenge
The importance of a data platform
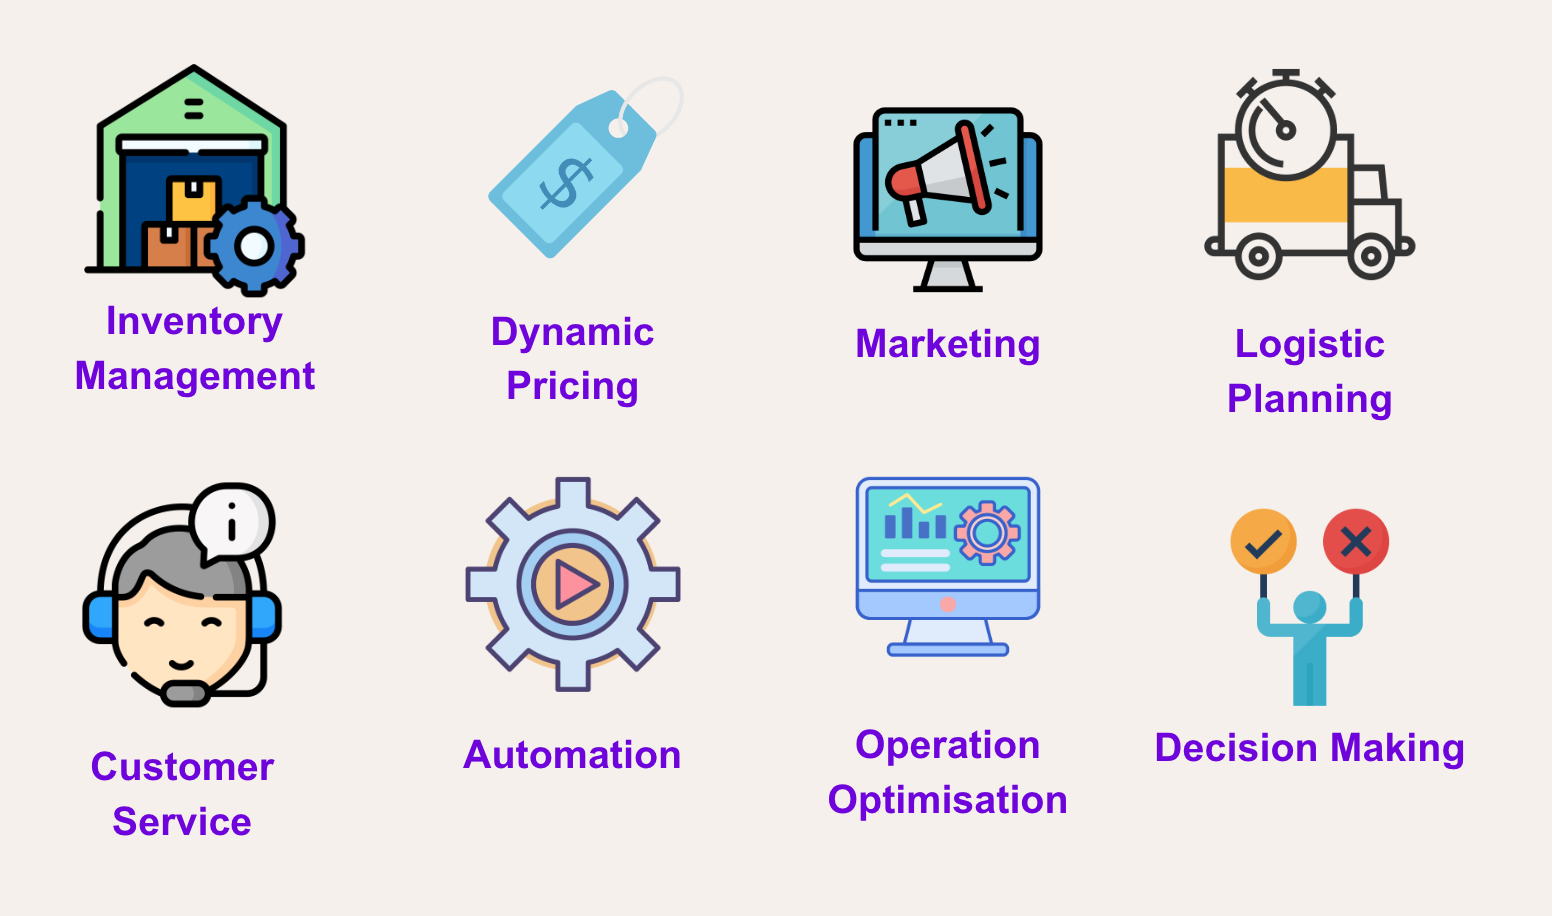
In the dynamic world of eCommerce, a robust data platform is paramount to our success. As New Aim evolves, so does the complexity of our operations, demanding significant time and effort. Imagine overseeing 5000 products throughout their lifecycle: from procurement to marketing, fulfilment, and after-sales. The sheer magnitude of these tasks renders manual decision-making virtually impossible.
Recognising this challenge, we've come to realise the indispensable role of a data platform. It serves as a crucial tool, allowing us to efficiently manage inventory, determine optimal selling prices, enhance listings and marketing strategies. Our Last-mile Postage Optimiser (LPO) technology also enables us to select suitable postage options, and choose the most suitable courier services for seamless order fulfilment. By harnessing the power of automation, we alleviate the burden of manual work in customer service and equip our New Aim leadership team with the insights needed to make well-informed decisions.
Our implementation of a new data platform aims to streamline daily operations, foster automation, and empower our team with actionable insights. These efforts are vital in driving the growth and prosperity of our company.
The Complexity of a Data Platform

Developing a robust data platform is a formidable undertaking, as illustrated in this diagram borrowed from Google's real-world ML systems blog. At New Aim, our data platform acts as a vital support system, enabling our data scientists and analysts to deliver valuable data services to the company. While stakeholders may simply receive the desired spreadsheet or dashboard, the behind-the-scenes effort required to produce accurate and timely results is substantial.
These endeavors involve the dedicated work of platform engineers, who meticulously establish the necessary infrastructure and allocate vital resources. Our reliance on data engineers ensures the smooth movement and cleansing of data for optimal usability. Furthermore, the expertise of machine learning engineers is paramount in transforming Python notebooks or SQL queries of our data scientists and analysts into production-ready pipelines, seamlessly integrating them into the larger system.
Considering the intricate nature of constructing a data platform, and the demanding production environment, it’s an exercise in skill and teamwork to develop new features and uphold existing services.
The Success of a Data Platform
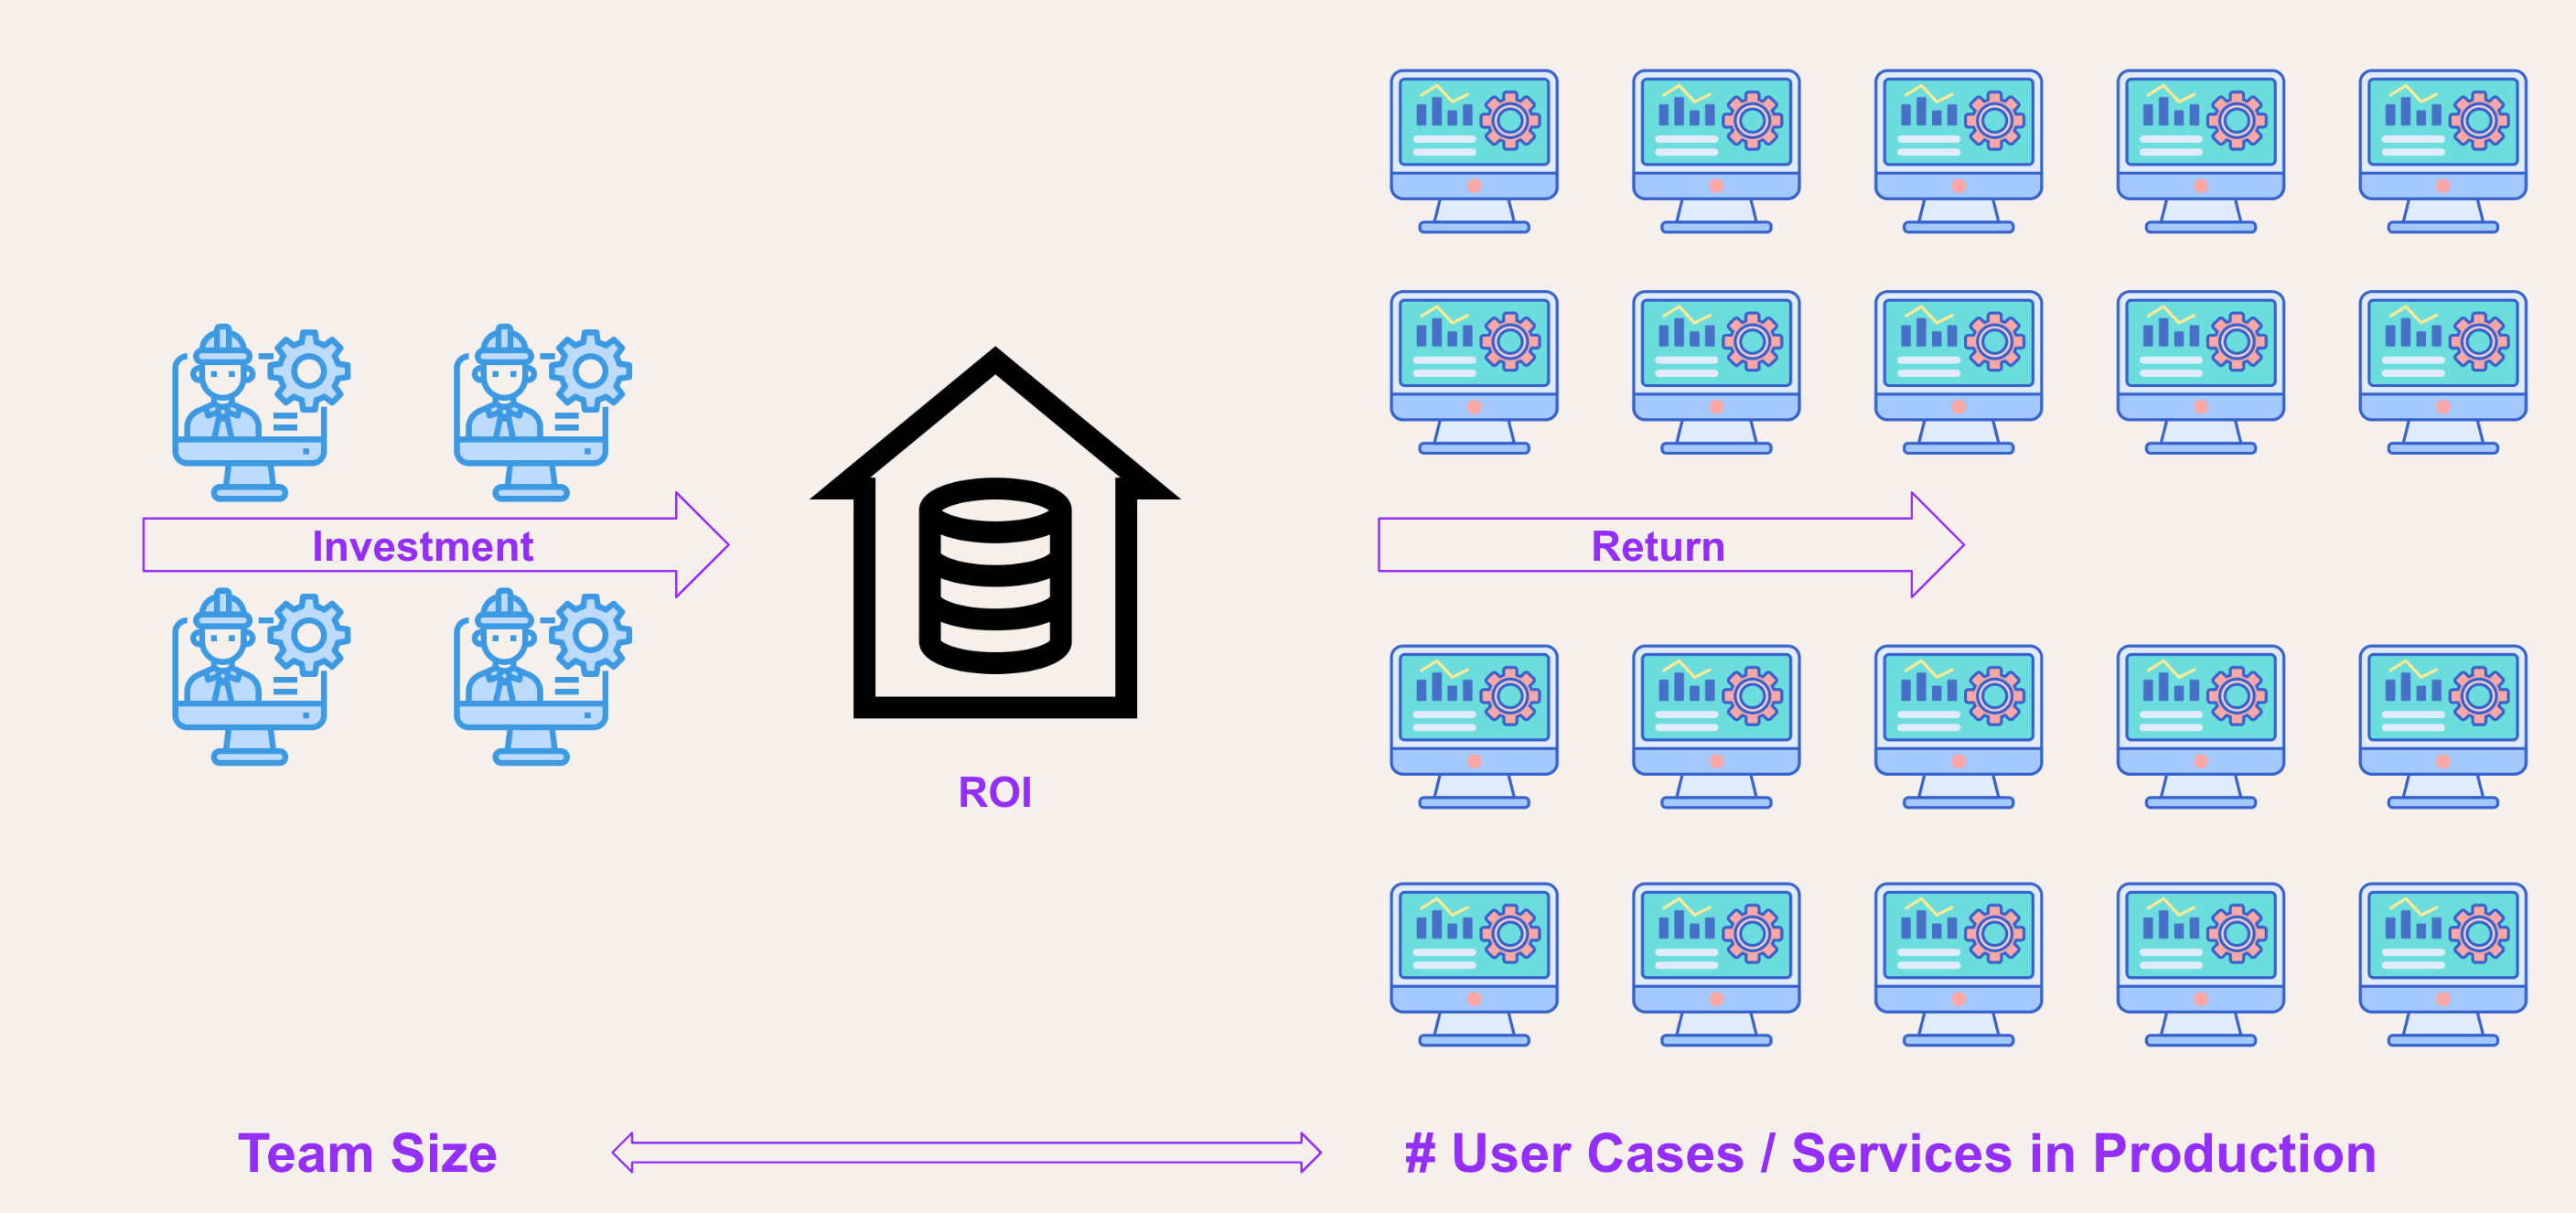
When considering the key elements of a successful data platform, several factors come to mind: scalability, reliability, security, and governance. However, from our perspective at New Aim, we place particular emphasis on ROI—the return on investment.
Measuring the investment in our platform team entails assessing the team's size, expertise, and resource allocation. Conversely, the return is determined by the multitude of use cases and services we deliver and sustain in a production environment.
We believe a successful data platform team is one that efficiently maintains a wide range of data services. That’s why we prioritise ROI.
Constructing a proper and contemporary data platform demands a substantial financial commitment. Justifying this expenditure to senior management is essential. Ultimately, the value of a data platform is realised through the services it offers to stakeholders.
Strategies in our Data Platform
General Guideline: Simplicity
When it comes to constructing our data platform at New Aim, , simplicity is our guiding principle. We aim to create a platform that is easily comprehensible and navigable, reducing the cognitive burden on our team when implementing changes. This commitment to simplicity is reflected in the following ways:
- Developer Friendly: Our goal is to ensure that our data platform is accessible to developers at all levels of experience. We encourage junior and entry-level team members to confidently contribute, while also welcoming input from other team members such as IT professionals, data analysts, and stakeholders.
- Transparency and Openness: To accommodate diverse contributors, it is essential that our platform is transparent and open. We strive to provide clear visibility into its workings and empower users to understand the available capabilities.
- Streamlined Change Process: A smooth change process is vital to ensure that only approved and thoroughly tested modifications are deployed in a production environment. We prioritise a seamless workflow that maintains the integrity of our platform.
Key Principle 1: Declarative Approach
Based on our commitment to simplicity, one of the key principles we embrace when building our data platform is the adoption of a declarative approach. Declarative programming enables us to abstract the control flow and concentrate on describing the desired outcome, rather than providing intricate step-by-step instructions.
We've learned valuable lessons from the experiences of other companies. For instance, many organisations heavily rely on stored procedures for data processing in their data warehouses. However, these stored procedures often involve complex logic, making it challenging to understand, debug, and reproduce issues when they arise.
To address these challenges, we have made a deliberate choice to minimise the use of stored procedures or Python, and instead, encourage the utilisation of YAML and SQL wherever possible. This approach offers enhanced simplicity and maintainability.
Key Principle 2: Stateless & Idempotent
Another crucial principle we adhere to is the adoption of stateless and idempotent approaches.
Stateless: When evaluating third-party tools or developing our own services, we prioritise solutions that are stateless. This means they operate independently of past interactions, eliminating the need for a database backend or other stateful resources. By avoiding these complexities, we save valuable time and effort in managing our platform.
Idempotency: Furthermore, we place significant emphasis on idempotency within our data pipelines and transformations. Idempotent operations can be applied multiple times without altering the result beyond the initial application. By designing our pipelines and transformation jobs to be idempotent, we can easily retry them in case of issues, effectively resolving most operational problems and preserving valuable time.
These principles not only simplify our architecture but also enhance the robustness and reliability of our data platform.
Key Decisions made
Apply GitOps Everywhere
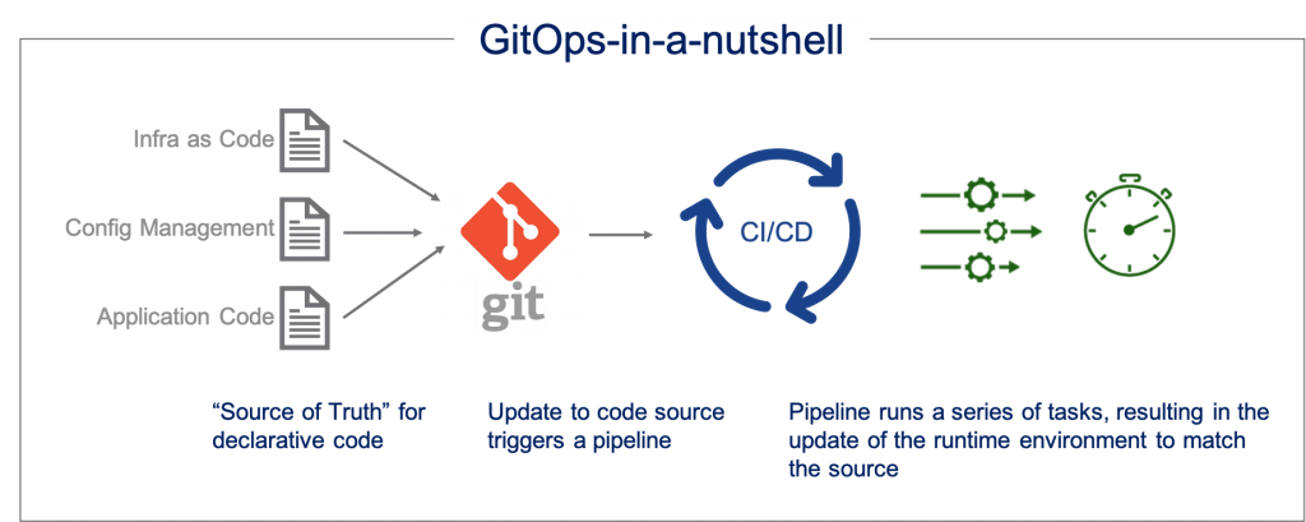
One of our pivotal decisions was to implement the GitOps framework throughout our data platform, merging the principles of Infrastructure as Code (IaC) with DevOps best practices. This approach revolves around utilising Git repositories as the single source of truth for our system configurations, employing Git pull requests and CI/CD pipelines to validate and automatically deploy changes.
This decision has yielded numerous advantages for our data platform at New Aim:
- Version Control: Every system alteration is meticulously tracked, allowing us to easily revert any unintended modifications. It also empowers our team to take calculated risks and iterate rapidly.
- Traceability: We maintain a comprehensive record of change authors, timestamps, and reasons, enhancing accountability and facilitating troubleshooting.
- Thorough Testing: We subject changes to a battery of tests, including functionality, performance, and data integrity testing, ensuring their validity before deployment. This meticulous testing process enhances the overall quality and mitigates the risk of introducing errors.
- Collaboration: GitOps facilitates peer review processes before merging changes into production, promoting collaboration, knowledge sharing, and ensuring that decisions are made by qualified and responsible individuals.
- Automation: By embracing GitOps, we have streamlined deployment and resource management procedures. In many cases, changes can be implemented without directly accessing the production environment, reducing the potential for human error and enabling efficient automation.
The adoption of GitOps has granted us heightened control, transparency, and operational efficiency in managing our data platform.
 In our data platform, GitOps is implemented across various areas to streamline management and maintainability. Here's how we apply GitOps in different components:
- Infrastructure: We utilise Infrastructure as Code (IaC) and CI/CD pipelines to define and create our cloud infrastructure. This enables version control of configurations and automated deployment of changes.
- Data Pipeline: Our data pipeline tools are configured using separate JSON files. These files define pipeline behavior and are executed based on predefined schedules or triggers.
- Transformations: Data transformation queries are stored in a dedicated SQL repository. These transformations run on a managed Spark cluster using Databricks, and we employ dbt (Data Build Tool) to manage the transformation workflows.
- Orchestration: Argo Workflows orchestrate various jobs, including data transformation tasks. Workflow specifications are defined in YAML files, facilitating management and version control.
- Kubernetes Workloads: YAML files define configurations for Kubernetes workloads, such as microservices or applications. ArgoCD synchronises these workloads into the production environment.
Furthermore, when developing in-house software, we follow a similar approach of separating execution and configuration. Our skilled development team focuses on building flexible execution components, while other team members can leverage these tools by modifying configuration files.
By segregating components into execution and configuration parts, our data platform becomes modular, flexible, and easy to manage. We prioritise tools that support independent configuration management, enabling changes without impacting the source code.
SQL as First-Class Citizen for Data Transformation
Within our data platform, we prioritise the use of SQL for data transformations. We view transformations as a means of expressing business rules, and collaboration with stakeholders is crucial during their development. Our aim is to ensure that these transformations are easily comprehensible and maintainable across the organisation.
While languages like Scala may offer complexity and sophistication, if they lack understanding among others in the company, it can result in issues and erode trust in the data platform. Additionally, managing various runtime environments for non-SQL languages like Python adds overhead and complexity.
By employing SQL, we leverage its declarative and stateless nature. SQL is widely understood, and many stakeholders have familiarity with reading and writing SQL queries. It also simplifies management and maintenance, particularly with the rise of tools like DBT-core, which greatly facilitate the management of SQL transformations.
Declarative and Stateless Tools First
 Another pivotal decision we made was the careful selection of tools and software for our data platform.
An important criterion was the ability to separate configuration from the tools themselves, adopting a declarative approach. This empowers us to independently manage and maintain configurations, ensuring flexibility and user-friendliness.
Furthermore, we considered the statelessness of the tools. We favored solutions that do not rely on a backend database for storing secrets or managing workflow status. This choice minimises maintenance costs associated with database reliability, backups, disaster recovery plans, and software upgrades.
Consequently, we opted for tools like Argo Workflow, dbt, and Meltano, which operate efficiently without the need for a backend database. These tools enable streamlined execution of jobs and workflows, without the additional overhead and maintenance burden of a database.
It's worth noting that tools like Airflow, Airbyte, and Superset are excellent and effective in their respective use cases. However, we decided against using them primarily due to the higher maintenance costs from our perspective.
Achievements and Limitations
Limitations
With the decisions and principles we have embraced, our data platform has delivered remarkable outcomes. As with everything, it is however important to acknowledge that our solution has its limitations and trade-offs.
Our primary focus has been on optimising Full-Time Equivalent (FTE) efficiency, which means that we may have compromised on other factors such as cost and flexibility. For instance, by not utilising Airflow, we have sacrificed certain powerful features that it offers. We continuously review our decisions and may incorporate those features if our strategy changes.
We have chosen to minimise the usage of SaaS, given our adoption of the GitOps framework. While comprehensive SaaS solutions with user-friendly interfaces can provide a low-maintenance platform, they often come with high license fees and limited system-level flexibility.
Another limitation we currently face is stream processing. Our design and principles have primarily focused on batch processing, and we are actively working on extending these principles to incorporate stream processing. It is an ongoing effort and a work in progress for us.
What have we achieved?

We’ve come a long way. The numbers do not lie. Each member of our data platform and engineering team is responsible for maintaining and supporting:
- Over 20 ingestion pipelines from diverse data sources, including both internal and custom pipelines developed in-house.
- 300+ data transformation queries, primarily in SQL with some in Python. We release changes almost daily without disruptions.
- More than 8 API endpoints to serve downstream data consumers.
- Additionally, more than 3 data services to cater to specific use cases like postage optimisation (Last-mile Postage Optimiser), demand forecasting, and product recommendation.
What’s truly astonishing is that, on average, just one person manages all these resources within our team. Our team efficiently manages over 300+ data workloads per person. This speaks volumes about the efficiency and productivity achieved through our low-maintenance data platform.
I couldn't be prouder of our accomplishments at New Aim. It exemplifies the value of our decisions and the effectiveness of our approach.